Installing Your PPR Five Ways Shower Mixer: A Step-by-Step Guide
2024-10-31
Once you’ve decided to upgrade your bathroom with a PPR Five Ways Shower Mixer, the next step is installation. While the task may seem daunting, with the right tools and guidance, it can be a straightforward process. This blog post will provide a comprehensive, step-by-step guide to installing your PPR Five Ways Shower Mixer effectively.
Preparation: Tools and Materials
Before diving into the installation, gather the necessary tools and materials:
- Tools:
- Pipe cutter
- Adjustable wrench
- Screwdriver
- Measuring tape
- Level
- Safety goggles
- Materials:
- PPR Five Ways Shower Mixer
- PPR pipes and fittings
- Teflon tape
- Pipe joint compound (if necessary)
- Plumber’s putty
Step 1: Turn Off the Water Supply
Before beginning any plumbing work, ensure that the water supply to your shower is completely turned off. This will prevent any accidental leaks and water damage during the installation process.
Step 2: Remove the Existing Shower Mixer
If you are replacing an old mixer, carefully disconnect it from the existing pipes. Use a pipe cutter to remove old PPR or copper pipes as needed. Ensure you have a bucket handy to catch any residual water.
Step 3: Prepare the Installation Area
Clean the area where the new mixer will be installed. Ensure that all old fittings are removed and that the surfaces are smooth. This step is crucial for creating a watertight seal.
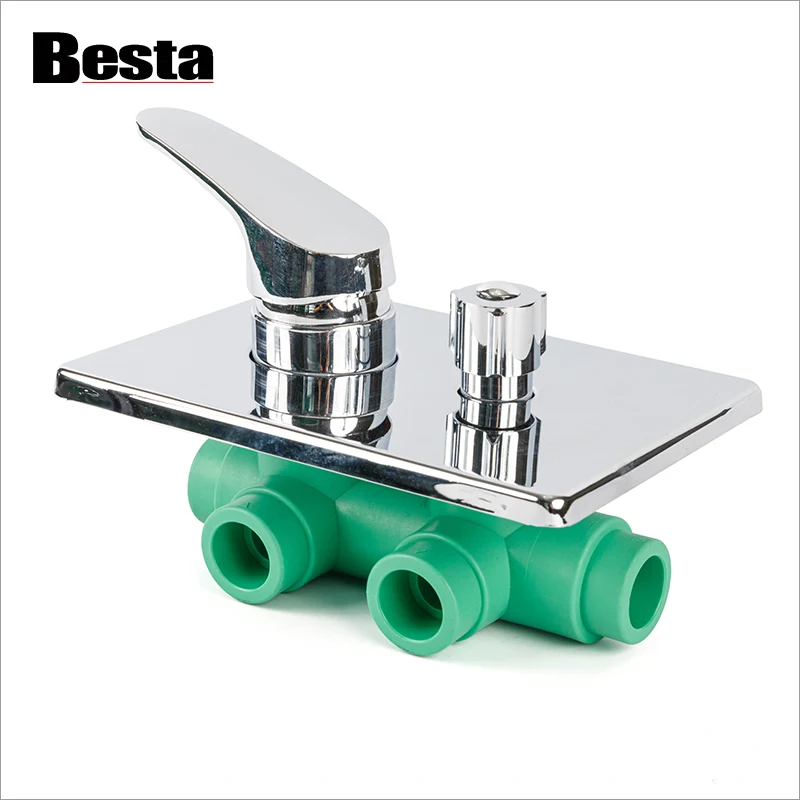
Step 4: Install the PPR Five Ways Shower Mixer
1. Connect the Mixer:
- Position the PPR mixer in place. Align the inlet and outlet ports with the existing plumbing.
- Secure the connections with the appropriate PPR fittings. Use Teflon tape on the threads to prevent leaks.
2. Attach the Outlets:
- Connect the outlets for the overhead shower, handheld shower, and bathtub spout. Make sure each connection is snug and secure.
3. Check Alignment:
- Use a level to ensure the mixer is perfectly aligned. This will help avoid future issues and ensure that the handles operate smoothly.
Step 5: Test for Leaks
Once all connections are made, turn the water supply back on gradually. Observe the mixer and connections for any signs of leaks. If you notice any, tighten the fittings as necessary.
Step 6: Finishing Touches
After confirming that everything is secure and leak-free, tidy up the installation area. Replace any access panels if necessary and ensure that all tools are removed from the workspace.
Installing a PPR Five Ways Shower Mixer can significantly enhance your shower experience, providing both convenience and luxury. By following this step-by-step guide, you can confidently tackle the installation process. Should you encounter any issues, consulting a professional plumber is always a wise choice. Enjoy your newly upgraded shower system!